Share this article
Get the week's best marketing content
In this article, we will show you how to set up a WordPress staging site step by step.
Are you looking for a simple way to set up WordPress staging site? Look no further, you have come to the right place. A staging site is a site used mainly for testing plugin updates and changes.
There are many hosting companies that can support you during the process. For instance, Bluehost WordPress staging site is a great one, or you can also set it up on SiteGround, which is another famous hosting company. In this article, we will show you how to set up a WordPress staging site step by step. Now let’s begin!
What is a WordPress staging site?
Technically speaking, a staging site is a mimic, which looks identical to your public website, with the main purpose is to test updates and changes before actually applying them to the main website.
Setting up a WordPress staging site used to be a challenge in the past, however, a lot has changed since then. Nowadays, everyone can do it on their own, and we will show you how.
Setting up a WordPress staging site
As technology developed, so are the methods of creating a staging site. Nowadays, there are countless ways, from simple to complex, to set up a WordPress staging site. This article aims to show you the easiest way; hence, setting up using your hosting server services would be the one to go.
Some of the biggest hosting companies will give you multiple options or suggestions on how to setup WordPress staging site that will meet your needs, and some even provide a one-click service. This means that all you need to do is click once, the hosting service will do the rest for you. Some of these companies can include: Bluehost, SiteGround or WP Engine…
How to set up Bluehost WordPress staging site
Bluehost is the best hosting company, to say the least. They offer a super quick 1-click Bluehost WordPress staging site solution, so that everyone can create one. So if you are using Bluehost services, how can you use this feature of theirs? Here’s how:
- Step 1: Log in to WordPress and go to your site’s admin area
- Step 2: Click on Bluehost >> Staging. You will be delivered to the Bluehost WordPress staging site wizard.
- Step 3: Choose ‘Create Staging Site’. By clicking on this button, you will now have Bluehost preparing the staging site for you.
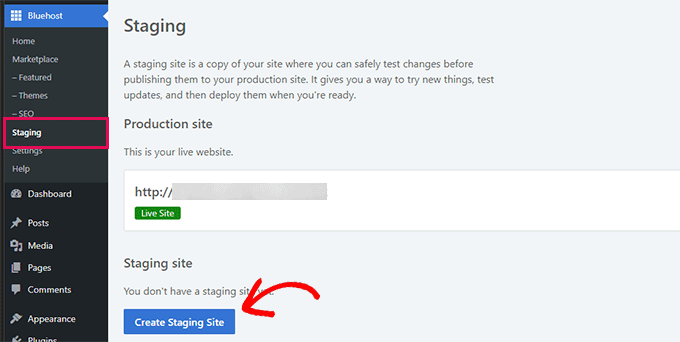
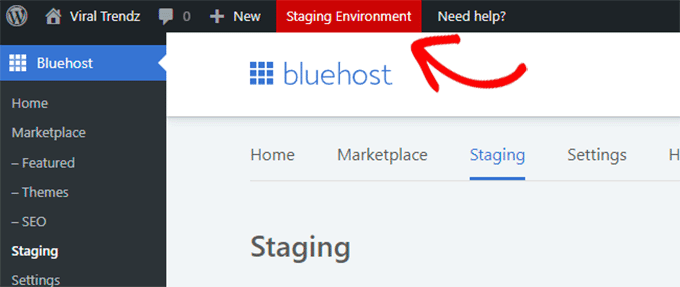
When the process is finished, you will have the option of switching from production site to staging site. Whenever you use the staging site, you will have a red button that says Staging Environment on top of the screen, indicating that you are using the staging website.
- Step 4: Deploy the updates to the production site:
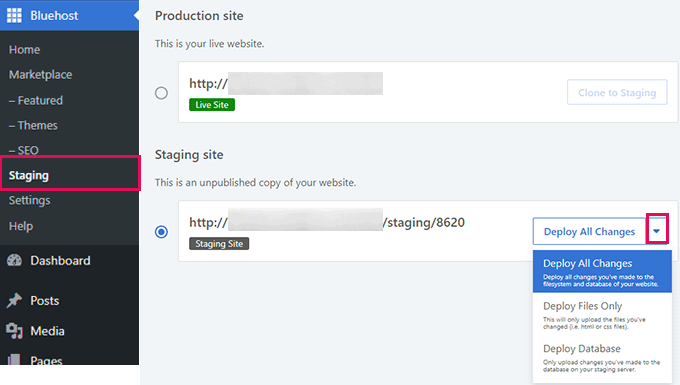
- Click on Bluehost >> Staging. In the Bluehost WordPress staging site wizard, you should notice the deploy options in the staging site section, right next to your staging website.
- In the drop-down menu, you can choose between All Changes, Files Only or Database.
- Click on Deploy in the confirmation popup and you are good to go, Bluehost will do the rest.
Note: Depending on the amount of files or database that you are changing or updating, it will take a while for Bluehost to process and create staging site WordPress bluehost, so be patient and wait until it is finished.
Setting up Staging Site on SiteGround
SiteGround is also one of the best hosting companies, just behind Bluehost, in our opinion. The reason why is that SiteGround requires slightly more steps to setup than the Bluehost WordPress staging site. However, their 1-click staging site setup feature isn’t too hard to follow. This is included in the GrowBig and GoGeek plans.
So, if SiteGround is hosting your website, here’s how you can use this feature:
- Step 1: Log in to SiteGround and click on the Website tab. You should see the Site Tools button right below. Click on it
- Step 2: Choose WordPress >> Staging
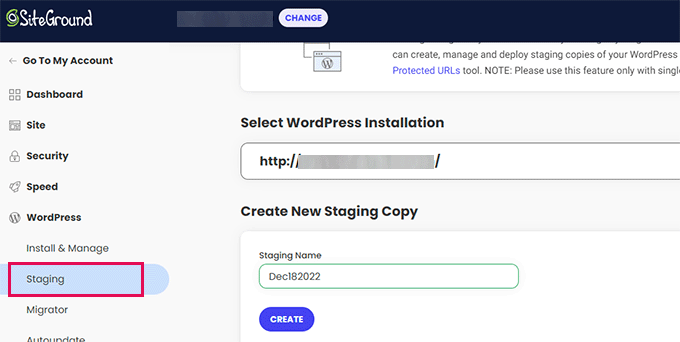
- Step 3: Select your website and name your staging site
- Step 4: Click on ’Create’. SiteGround will proceed and set up a staging site for you.
- Step 5: Click on ‘Go to protected URLs’ to create a password for your staging site, keeping secure and private.
- Step 6: Enter your username and password for the staging site, then click on ‘Protect’ to save.
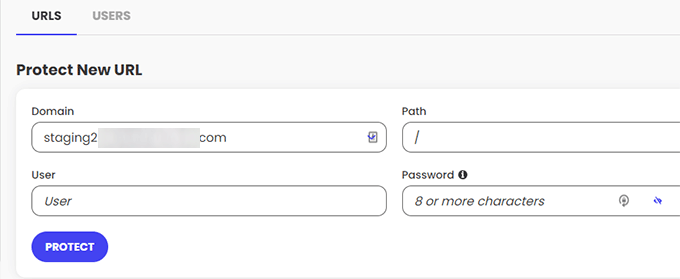
- Step 7: Go back to WordPress >> Staging and choose the ‘Admin Panel’ icon, which is next to the staging site that you just created. This will bring you to the WordPress admin area.
- Step 8: Test your changes and updates on the staging site, and then deploy them after you are done.
- Step 9: Deploy all your changes by going back to WordPress >> Staging >> Click on the three-dot icon next to the staging site >> Choose between ‘Full Deploy’ or ‘Custom Deploy’, depending on your needs.

Staging Site setup using WP Engine
Another option for you to consider is WP Engine. Similar to the other 2 options, you can easily create a staging site, using the one-click feature of WP Engine. Here’s how you can optimize this feature if you are using WP Engine hosting service:
- Step 1: Log in to WP Engine with your personal account
- Step 2: Click on the ‘Sites’ page and choose your website
- Step 3: On your website dashboard, choose ‘Add Staging’ on the left column
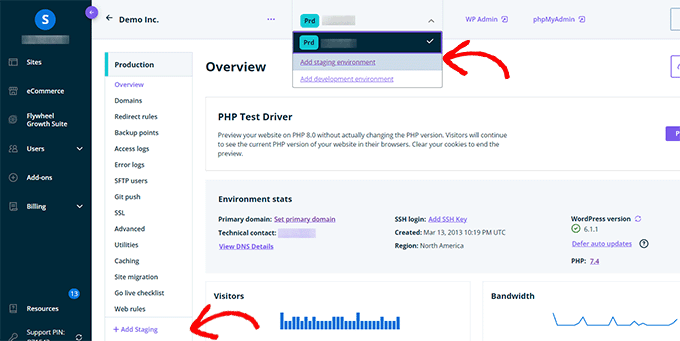
- Step 4: In the ‘Add Environment’ section, you will see several options for the staging environment. Choose the desired one that suits your needs.
- ‘Start with a new blank site: It will give you a new empty site for you to work on.
- Start with a guided experience: This option creates a new staging site with demo content.
- Copy an existing environment to this site: This option will copy your production site or development environment to the staging site
- Move an existing environment: This moves an environment to this staging site
- Start with a WooCommerce site: You will get a new WordPress site with the WooCommerce installed.
- Step 5: Pick the latest backup to copy. Then choose ‘Next’ to proceed.
- Step 6: Name your staging environment (please note that you will not be able to change this later on, so choose carefully).
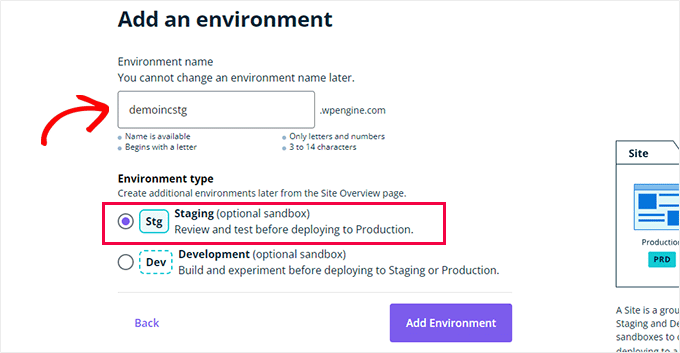
- Step 7: Choose ‘Create Environment’ for Wp Engine to start the process. After it is finished, you will be brought to the staging site dashboard.
- Step 8: Setup the password for your staging site by choosing the Padlock button on the top right corner of your screen >> Click on ‘Utility’ >> Set your username and password.
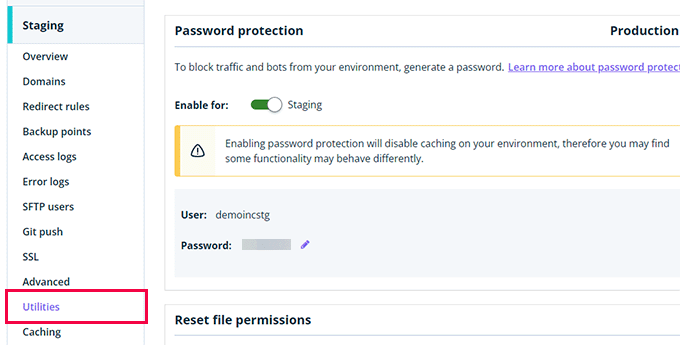
- Step 9: Deploy changes:
- Choose ‘Copy Environment’ to start deploying.
- Then choose the sources (your Staging site) and destination environment (your Production site).
- Choose between ‘All database tables and file system’, ‘Specific database tables and file system’ or ‘Only the file system’, depending on your needs.
- Step 10: Choose ‘Review and Confirm’ to proceed and you are good to go. WP Engine will do the rest.
Conclusion
These are some of the simplest ways to set up a staging site. Other than the methods we showed you, feel free to enjoy all features of these wonderful hosting services. Happy staging!!!


